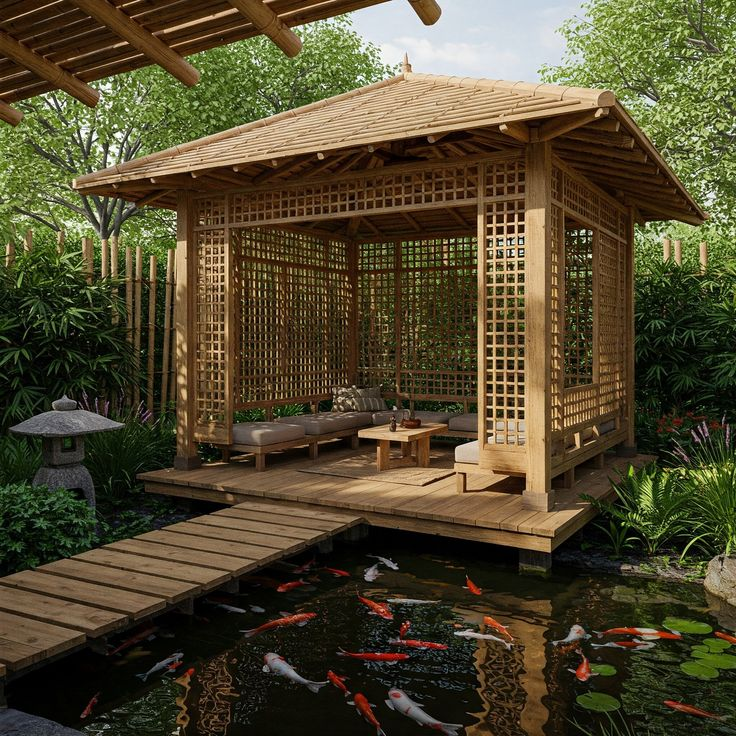
12 DIY Recycled Garden Decor Ideas (Turn Trash into Treasure)
Ready to give your garden a major glow-up without spending a dime? We’re diving headfirst into the world of DIY garden decor recycled ideas, turning your trash into treasure. Get ready to unleash your inner artist and transform everyday junk into stunning garden masterpieces that’ll have your neighbors green with envy. It’s time to get crafty, save the planet, and create a garden that’s 100% you.
Before we get our hands dirty, let’s look at why this is such a great idea. It’s not just about making cool stuff; it’s good for your brain and the planet! Studies show that being creative and spending time in nature are total game-changers for our happiness.
A study published in the Journal of Health Psychology found that gardening can reduce stress even more effectively than reading a book. Imagine that! Digging in the dirt is literally therapeutic. When you add the creative rush of upcycling, you’re getting a double dose of feel-good vibes.
“The glory of gardening: hands in the dirt, head in the sun, heart with nature. To nurture a garden is to feed not just the body, but the soul.” – Alfred Austin
And what about the recycling part? It’s a huge deal. Here’s a quick look at how much waste we’re talking about:
| Material | Average Household Waste (Yearly) | Recycling Impact |
|---|---|---|
| Plastic Bottles | ~1500 bottles | Every ton recycled saves 1.5 tons of CO2 |
| Glass Bottles | ~500 bottles | Recycled glass reduces air pollution by 20% |
| Tin/Aluminum Cans | ~800 cans | Recycling one can saves enough energy to power a TV for 3 hours |
| Old Tires | 1-2 per car | Tire recycling can create materials for roads and playgrounds |
Data compiled from various environmental protection agency reports and recycling advocacy groups.
So, every bottle you turn into a wind chime or tire you paint as a planter is a small victory for Mother Earth. You’re not just decorating; you’re making a difference. Let’s get started!
1. Magical Tin Can Lanterns
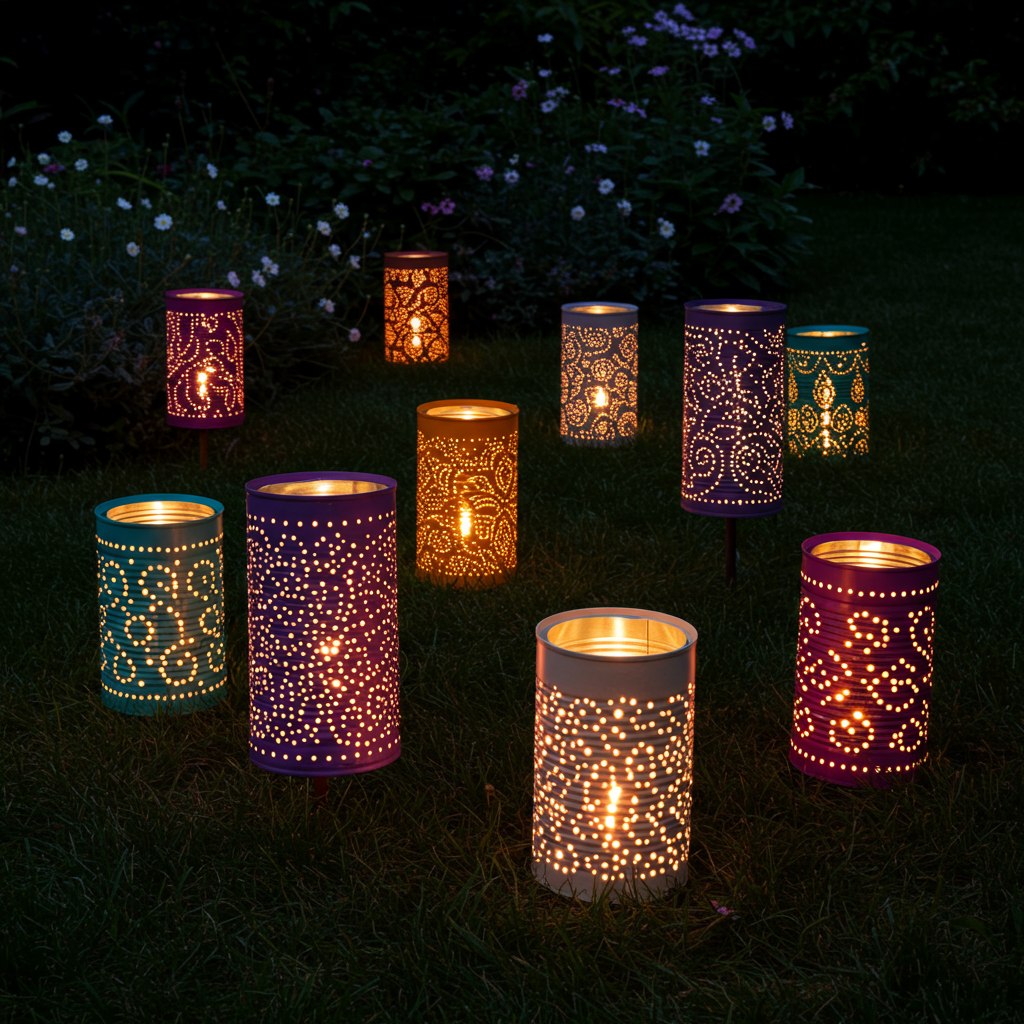
Got some old soup or bean cans lying around? Don’t toss ’em! With a little bit of work, you can turn them into magical lanterns that will make your garden twinkle at night. This is one of the easiest and most satisfying DIY garden decor recycled ideas out there.
First things first, you need to clean your cans thoroughly. Nobody wants old bean juice messing up their craft project! Once they’re squeaky clean and the labels are off, you’re ready for the fun part. Fill the cans with water and pop them in the freezer.
Why, you ask? Freezing the water makes the can super solid. This means when you start hammering nails into it to make your design, the can won’t get all dented and crumpled. It’s a simple trick that makes a huge difference.
Once your can is a solid block of ice, you can start punching holes in it. Use a hammer and a nail to create any pattern you like. You can go for stars, swirls, or even spell out a word.
Pro Tip: Draw your design on a piece of paper first and tape it to the can. This gives you a guide to follow and makes sure your pattern looks amazing.
After you’re happy with your design, let the ice melt and pour out the water. Now it’s time to paint! Use a spray paint that’s meant for metal. You can go for classic black, shiny gold, or a whole rainbow of colors. Let it dry completely, and then you’re ready to add a light.
You can use a small tea light candle (the battery-operated ones are safest) or a string of fairy lights. Just pop it inside, and voila! You’ve got a gorgeous, one-of-a-kind lantern. Hang them from tree branches or place them along a pathway for a truly magical effect.
2. Groovy Glass Bottle Wind Chimes
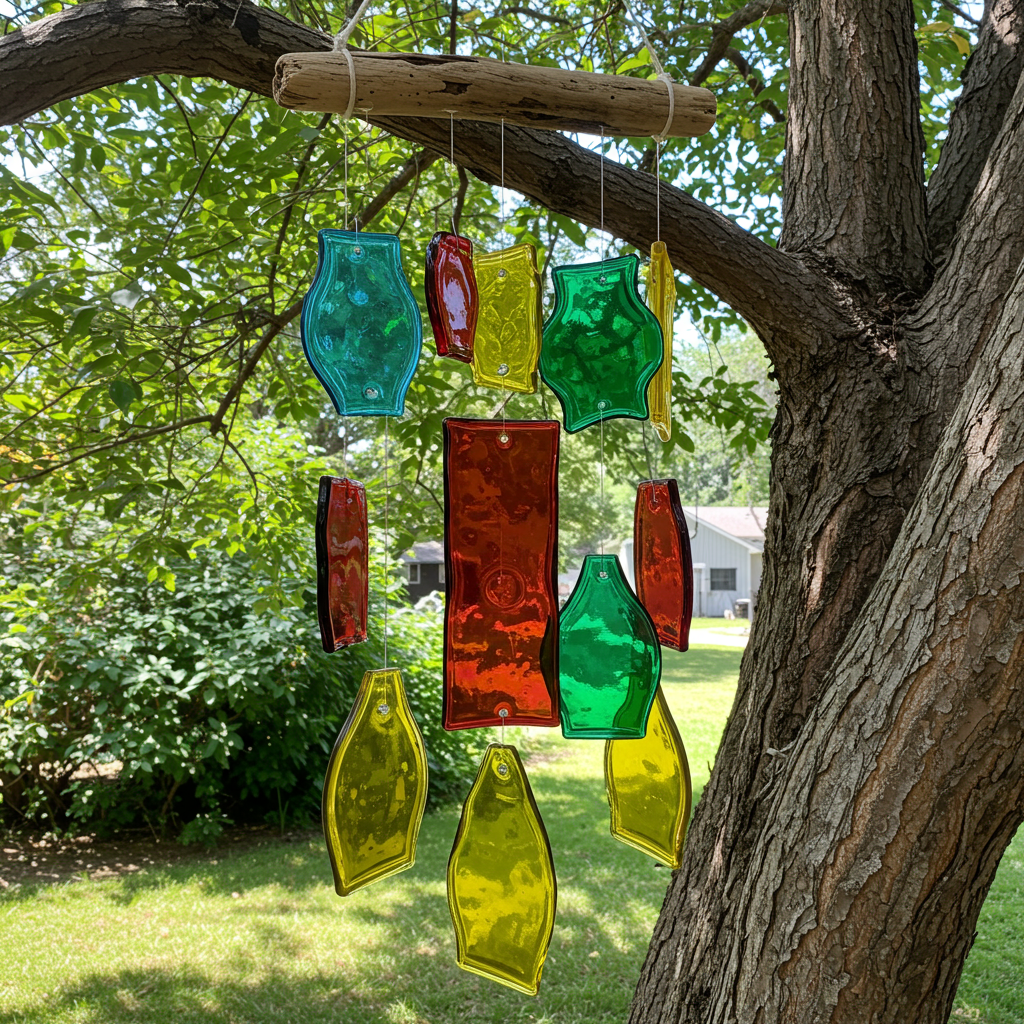
Don’t let those empty wine or soda bottles end up in the recycling bin. With a bit of creativity, you can turn them into beautiful wind chimes that will fill your garden with a gentle, tinkling sound. This project is a little more advanced, but the result is totally worth it.
First, you’ll need to gather your supplies. You’ll need a few empty glass bottles (different colors look great together), a glass cutter, some sandpaper, and strong string or fishing line. Safety first, folks! Always wear safety goggles and gloves when you’re cutting glass.
To cut the bottles, you’ll use the glass cutter to score a line around the bottle where you want it to break. This takes a steady hand, so take your time. Once you have a good score line, you’ll need to alternate between pouring hot and cold water over it. This temperature shock will cause the glass to break cleanly along the line.
It might take a few tries to get the hang of it, so don’t get discouraged. Once you’ve successfully cut your bottles, it’s time to smooth the edges. Use sandpaper to carefully sand down any sharp bits. You want your wind chime to be beautiful, not dangerous!
Now comes the fun part: assembling your wind chime. You’ll need a top piece to hang everything from. A piece of driftwood or a metal ring works perfectly. Drill small holes in your top piece for the strings.
Cut different lengths of string for your bottle pieces and the clapper (the part that hits the glass). For the clapper, you can use a wooden bead, a metal washer, or even a pretty stone. Tie your bottle pieces and the clapper to the top piece, and you’re done! Hang your new wind chime somewhere it can catch the breeze and enjoy the beautiful music.
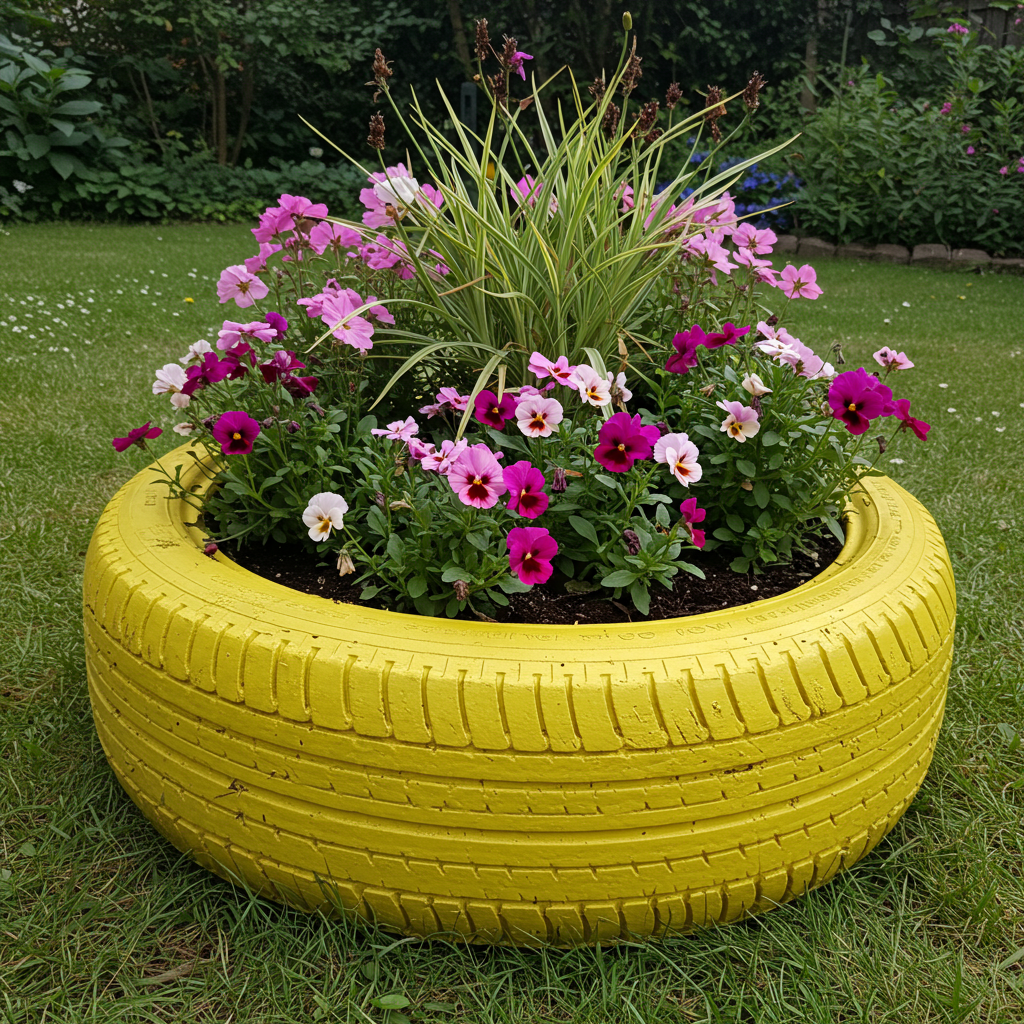
3. Totally Awesome Tire Planters
Old tires are a huge environmental problem, but they can be a gardener’s best friend. With a splash of paint and some creativity, you can turn an old tire into a vibrant, eye-catching planter. This is a super durable and long-lasting option for your garden.
First, you’ll need to find an old tire. You can often get them for free from local garages or tire shops. Once you have your tire, give it a good scrub with soap and water. You want to get all that road grime off before you start painting.
Now for the fun part: painting! Use a primer first to help the paint stick. Then, let your imagination run wild. You can paint your tire a solid, bright color, or you can get fancy with patterns like polka dots, stripes, or even a floral design. Make sure to use outdoor-friendly paint that can stand up to the elements.
Once your paint is dry, you can choose to stack your tires or just use one. Stacking them at different angles can create a really cool, modern look. You can even hang a tire from a strong tree branch to create a unique hanging planter.
Before you add your soil and plants, it’s a good idea to drill a few holes in the bottom of the tire for drainage. This will prevent your plants from getting waterlogged. Then, fill it up with soil and get planting!
Tire planters are great for flowers, herbs, and even vegetables like potatoes or lettuce. They’re a fantastic way to add a pop of color and a touch of whimsy to your garden. Plus, you’re saving a tire from a landfill. That’s a win-win!
4. Pallet Power: Vertical Gardens
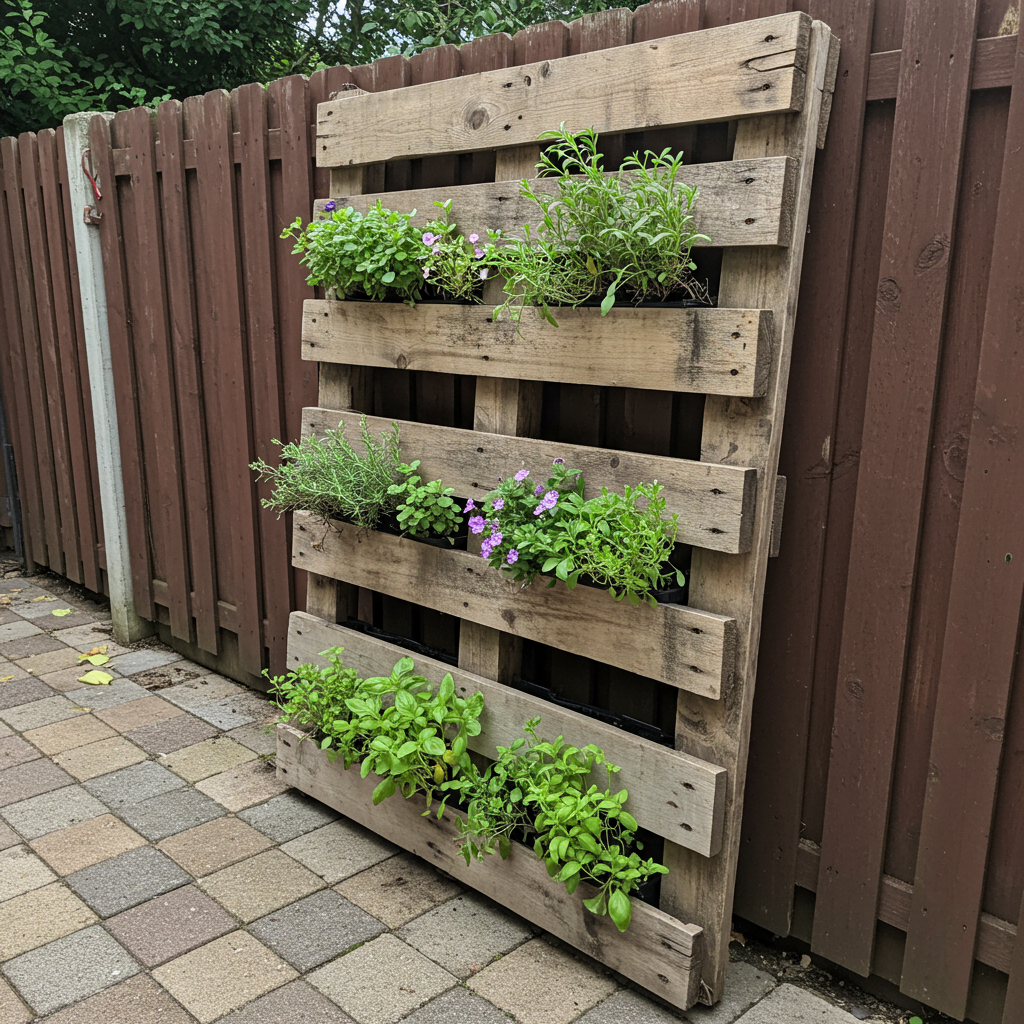
If you’re short on space, a vertical garden is the way to go. And what better way to build one than with a free wooden pallet? You can often find pallets behind grocery stores or warehouses. Just make sure to ask before you take one!
When you’re choosing a pallet, look for one that’s heat-treated (it will have an “HT” stamp) rather than one treated with chemicals. This is especially important if you plan on growing herbs or vegetables. Safety first, always!
Once you have your pallet, you’ll need to do a little prep work. Sand down any rough spots to avoid splinters. You can leave the pallet natural for a rustic look, or you can paint it to match your garden’s color scheme.
Next, you’ll need to create pockets for your plants. Staple a double layer of landscape fabric to the inside of the pallet slats. This will hold the soil in place while still allowing for drainage. Leave the top slats open for planting.
Now, lean your pallet against a wall or fence and fill the pockets with soil. It’s time to get planting! Herbs like mint, parsley, and basil are great choices for a pallet garden. Succulents also work really well and are super low-maintenance.
A pallet garden is not only a space-saver, but it’s also a stunning piece of living art. It’s a fantastic way to add some green to a small balcony or patio. Plus, it’s a great conversation starter!
5. Shiny CD Mosaics
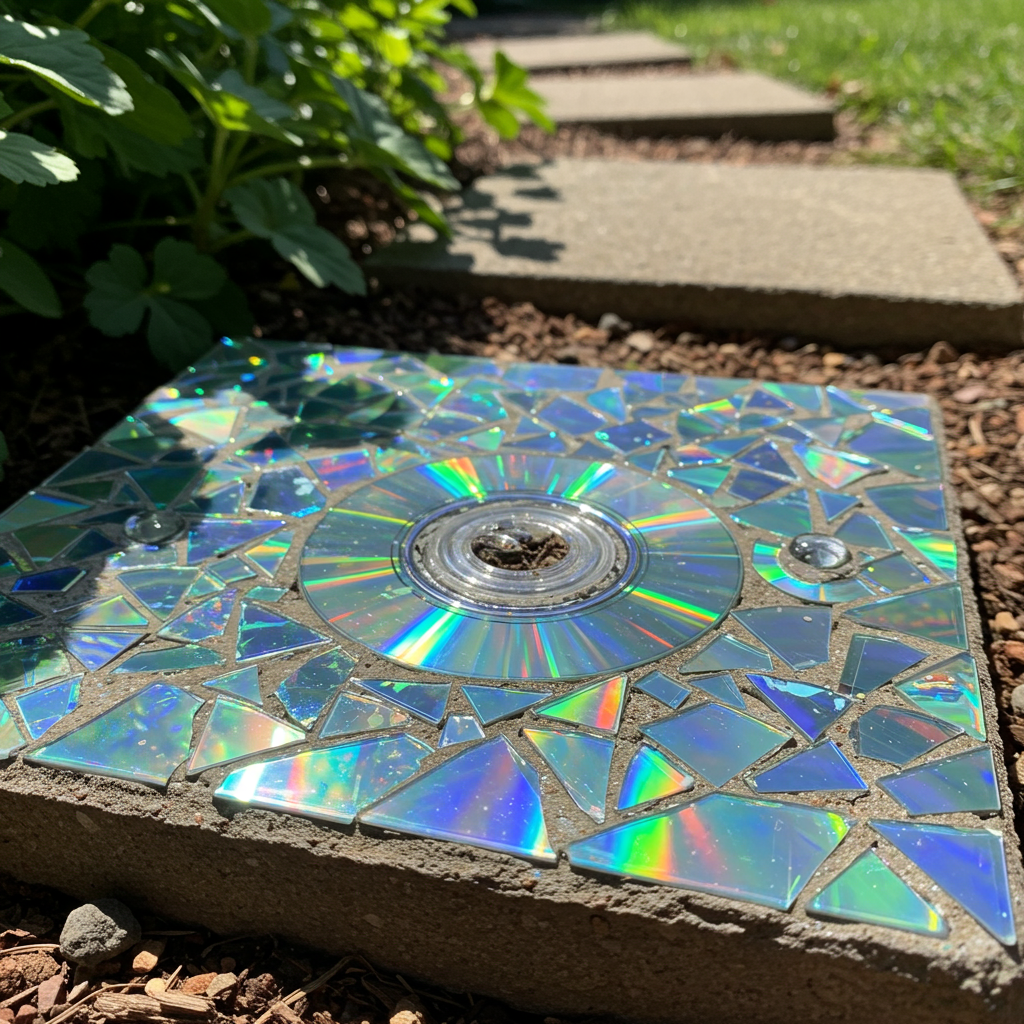
Got a stack of old CDs or DVDs that you no longer use? Don’t throw them away! You can smash them up and use the pieces to create beautiful mosaics. The holographic, rainbow effect of the CD pieces will add a touch of sparkle and magic to your garden.
This project is super fun, but it can be a little messy. Make sure to wear safety goggles to protect your eyes from any flying pieces. Start by taking your old CDs and cutting them into smaller pieces with a strong pair of scissors. You can make them all different shapes and sizes.
Next, you’ll need to decide what you want to decorate. You can create a mosaic on a stepping stone, a flower pot, or even a birdbath. The possibilities are endless!
Once you have your object, you’ll need some strong, waterproof glue. Apply a layer of glue to a small section of your object and start arranging your CD pieces. You can create a specific pattern or just go for a random, abstract look. Leave a small gap between each piece for the grout.
After you’ve covered your entire object with CD pieces, let the glue dry completely. This might take a day or two. Once it’s dry, it’s time to grout. Mix up your grout according to the package directions and spread it over your mosaic, making sure to get it in all the gaps.
Before the grout dries completely, use a damp sponge to wipe the excess off the CD pieces. You want your mosaic to be shiny and sparkly, not covered in a layer of grout! Let the grout cure for a few days, and then your masterpiece is ready to be displayed in your garden.
6. Kooky Old Boot Planters
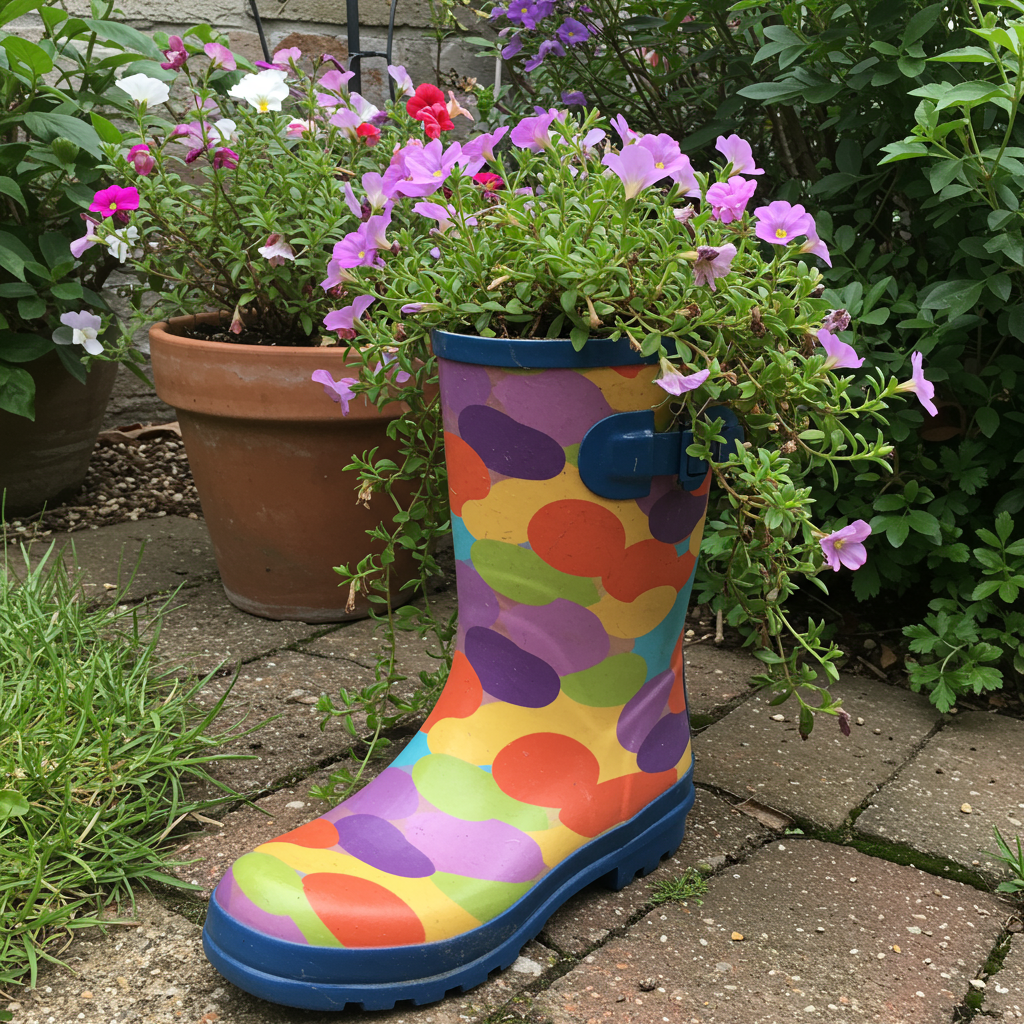
Got an old pair of rain boots or hiking boots that have seen better days? Don’t throw them out! With a little bit of imagination, you can turn them into quirky and adorable planters. This is one of those DIY garden decor recycled ideas that is sure to make people smile.
The first step is to prepare your boots. Give them a good cleaning, inside and out. Then, you’ll need to create some drainage holes in the bottom. You can use a drill or a sharp knife to do this. This is a super important step to keep your plants from drowning!
Now for the fun part: planting! Fill your boots with potting soil, leaving a little bit of room at the top. Then, you can add your plants. Flowers with trailing vines, like petunias or lobelia, look especially great because they’ll spill over the sides of the boots.
You can leave your boots as they are for a rustic, worn-in look, or you can paint them to match your garden’s decor. If you’re using rain boots, you can find them in all sorts of fun colors and patterns already.
Place your boot planters on your porch, by your front door, or nestled among other plants in your garden. They’re a surefire way to add a touch of personality and humor to your outdoor space. It’s a fun and unexpected way to give your old boots a new lease on life.
7. Wacky Plastic Bottle Sprinklers
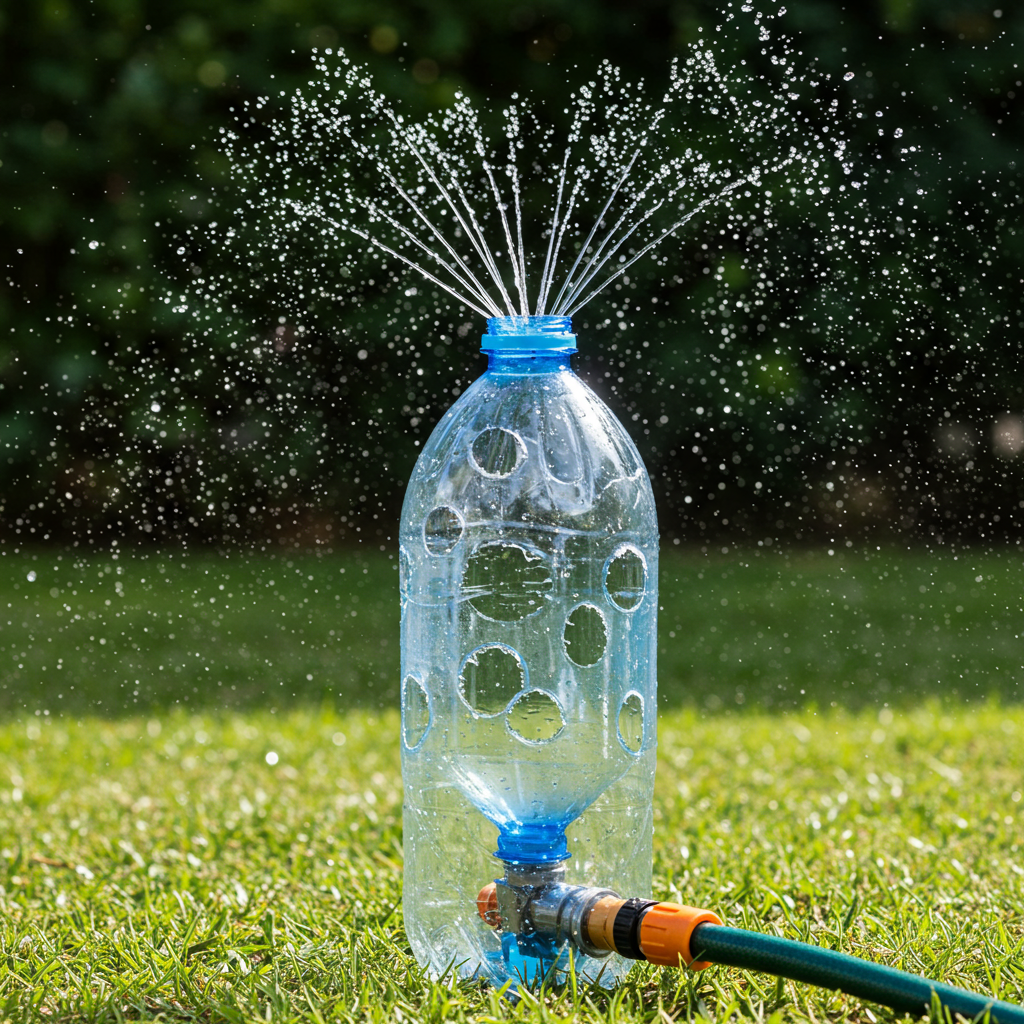
On a hot summer day, there’s nothing better than running through a sprinkler. But you don’t need to go out and buy a fancy one. You can make your own with just a plastic soda bottle and a hose! This is a super simple and fun project that your kids will love.
First, you’ll need a clean, empty 2-liter soda bottle. Take the label off and give it a good rinse. Then, use a small nail or a thumbtack to poke holes all over the bottle. The more holes you poke, the more streams of water you’ll have!
Next, you’ll need to attach the bottle to your hose. You can do this with some waterproof tape, like duct tape or electrical tape. Make sure you get a good, tight seal so the water doesn’t leak out at the connection.
And that’s it! You’re ready to turn on the water. The water will fill up the bottle and spray out of all the little holes, creating a fun, wacky sprinkler. It’s a great way to cool off on a hot day and water your lawn at the same time.
This is a fantastic project to do with kids. They can help poke the holes and decorate the bottle with permanent markers. It’s a great way to teach them about recycling and get them excited about playing outside.
8. Clever Wine Cork Plant Markers
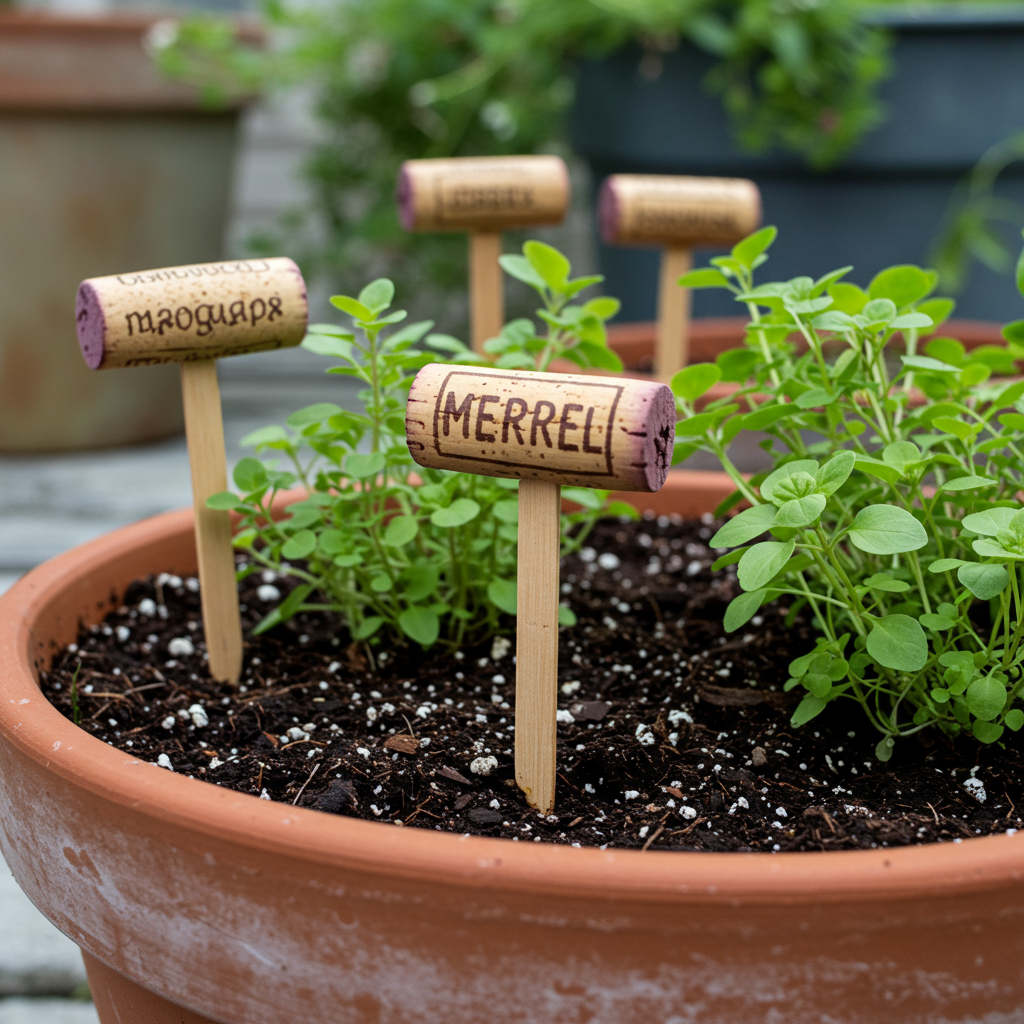
If you’re an avid gardener, you know how important it is to keep track of what you’ve planted where. But you don’t need to buy boring plastic plant markers. You can make your own with a few wine corks and a skewer!
This is a super simple and elegant solution to an age-old problem. Start by gathering your used wine corks. This is a great excuse to enjoy a nice bottle of wine! You’ll also need some bamboo skewers and a permanent marker.
Simply write the name of your plant on the side of the cork with the permanent marker. Then, carefully push the sharp end of the skewer into the bottom of the cork. And that’s it! You’ve got a stylish and waterproof plant marker.
These little markers look so much nicer than the plastic ones you buy at the store. They add a touch of rustic charm to your garden beds or herb pots. Plus, they’re a great way to remember that amazing bottle of wine you had.
You can get creative with your lettering to add even more personality. And if you’re a teetotaler, don’t worry! You can often buy used corks at craft stores or online.
9. Enchanting Broken Pot Fairy Gardens

Don’t be sad about a broken flower pot! A broken pot is just an opportunity to create something magical: a tiny fairy garden. This is a wonderfully creative way to turn a mishap into a masterpiece.
Start with your broken pot. The way it’s broken will actually help determine the design of your fairy garden. A pot that’s broken in half can become a two-level garden. A pot with a chunk missing from the side can become a little cave or grotto.
Use the broken pieces to create steps, terraces, or walls within your fairy garden. You can glue them in place with a strong, waterproof adhesive. This is where you can really let your imagination run wild!
Once you have your structure, you can add soil and small plants. Look for plants with tiny leaves and flowers, like moss, small succulents, or miniature ivy. These will help create the illusion of a tiny, magical world.
Now for the best part: decorating! You can add all sorts of tiny accessories to your fairy garden. Think tiny houses, furniture, pathways made of pebbles, and, of course, a few fairies. You can find these at craft stores, or you can even try making your own out of twigs and clay.
A broken pot fairy garden is a beautiful and whimsical addition to any garden. It’s a tiny world that will capture the imagination of kids and adults alike. And it’s a wonderful reminder that even broken things can be made beautiful again.
10. Jazzy Spoon Wind Chimes
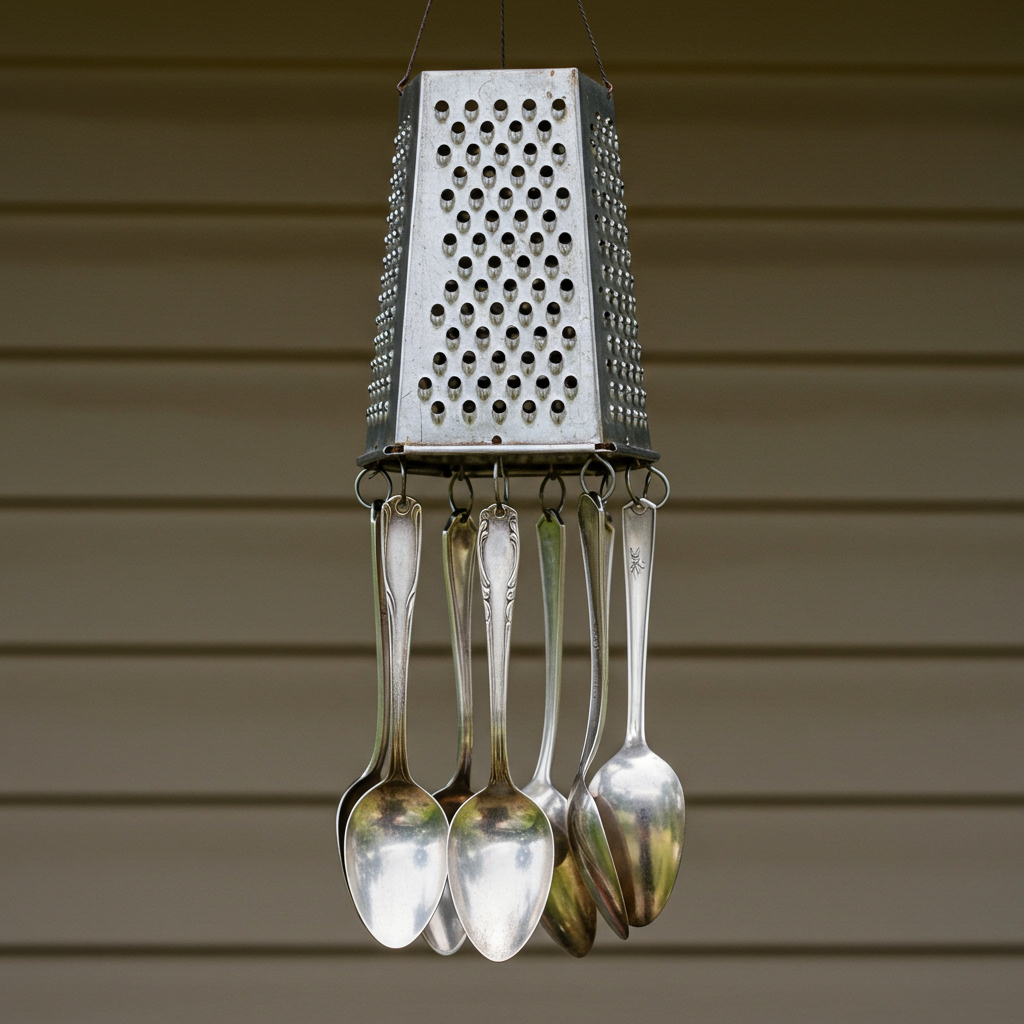
If you have some old, mismatched spoons in your kitchen drawer, don’t let them just sit there. You can turn them into a funky and fun wind chime that will add a touch of vintage charm to your garden. This is a great project for anyone who loves that shabby chic look.
You’ll need a handful of old spoons (and maybe a fork or two for variety), a drill with a small bit, and some fishing line or strong string. You’ll also need something to hang your spoons from. A vintage grater, a small colander, or even a sturdy branch will work perfectly.
First, you’ll need to drill a small hole in the handle of each spoon. Be careful and take your time with this step. Once you have your holes, you can start assembling your wind chime.
Cut different lengths of string for each spoon. This will allow them to hang at different levels and create a more interesting look. Tie the spoons to your top piece, making sure they’re close enough to clink together in the breeze.
You can leave your spoons as they are for a classic silver look, or you can get creative. You can flatten the spoons with a hammer and stamp words or designs on them. You can also paint them bright, cheerful colors.
A spoon wind chime is a unique and personal piece of art for your garden. It’s a great way to use up old silverware and add a touch of musical whimsy to your outdoor space.
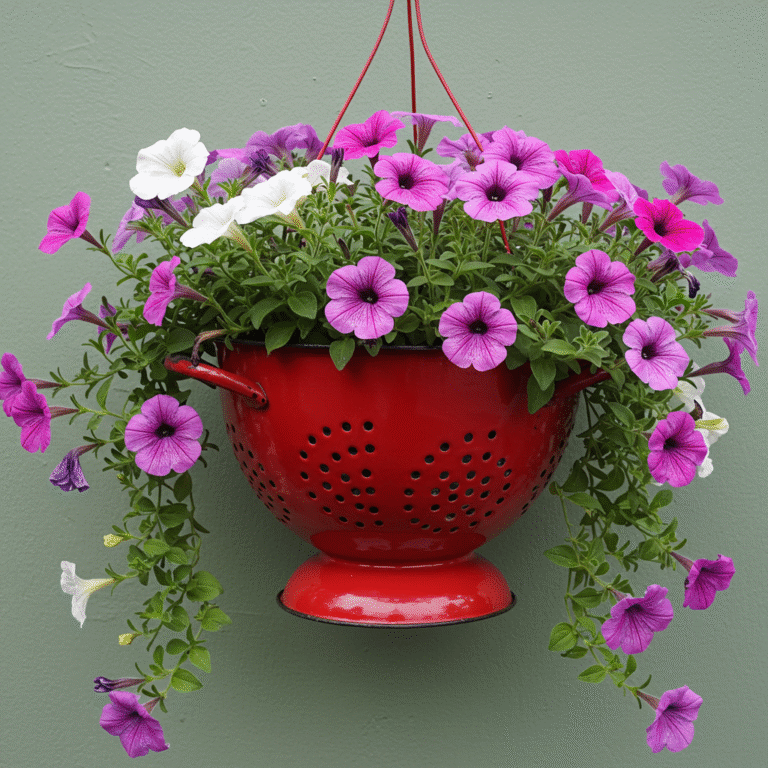
11. Cool Colander Hanging Baskets
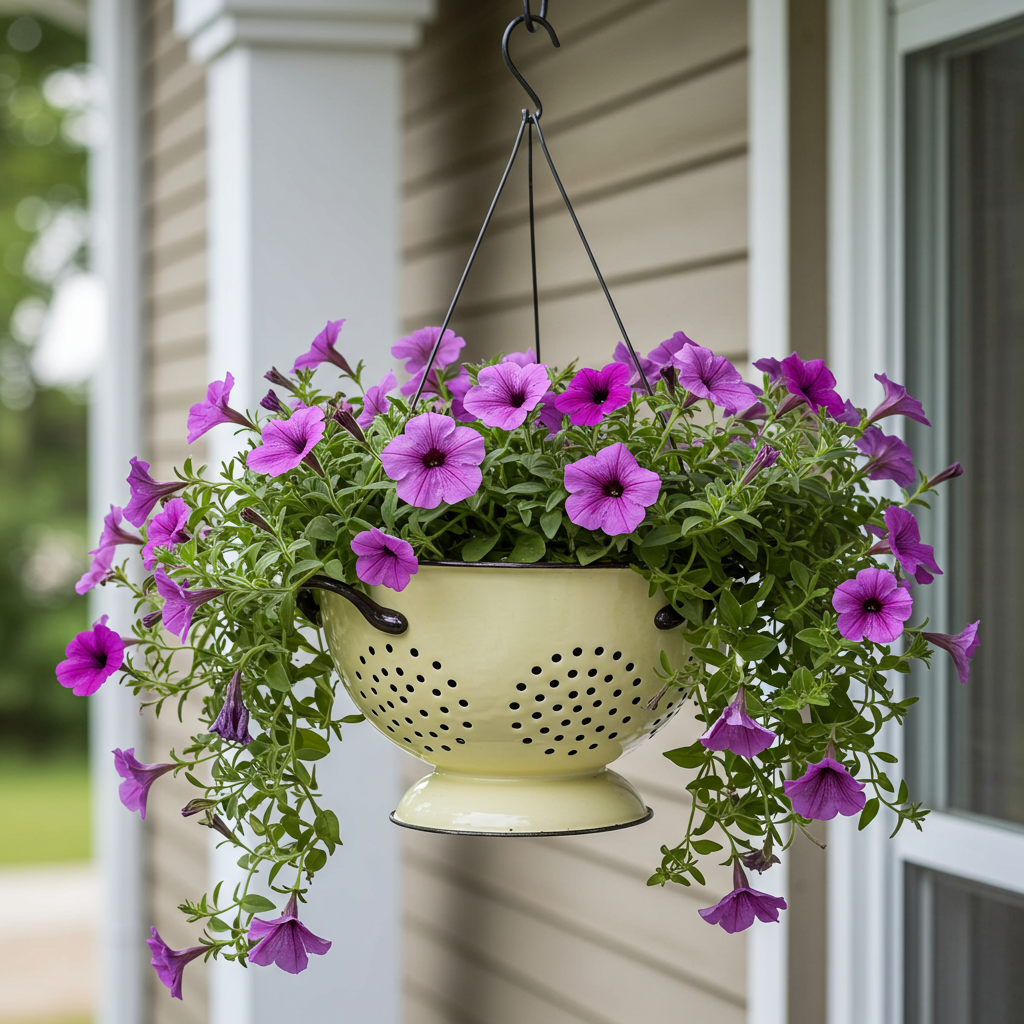
An old colander can find a new life in your garden as a fantastic hanging basket. Its built-in drainage holes make it the perfect home for a variety of plants. This is one of the easiest and most practical DIY garden decor recycled ideas.
Find an old metal or enamel colander. You can often find them at thrift stores or garage sales for next to nothing. The more colorful and vintage-looking, the better!
The great thing about a colander is that the drainage is already taken care of. However, if you’re worried about soil falling through the holes, you can line the inside with a coffee filter or a piece of landscape fabric.
Now, you’re ready to plant. Fill your colander with potting soil and add your plants. Flowers that trail and spill over the sides, like fuchsias, petunias, or ivy, look absolutely stunning in a colander hanging basket.
To hang your colander, you can use a strong chain or rope. Attach it to the handles of the colander and hang it from a hook on your porch or a sturdy tree branch. It’s a simple, charming, and incredibly effective way to add some greenery to your garden.
12. Sweet Teacup Bird Feeders
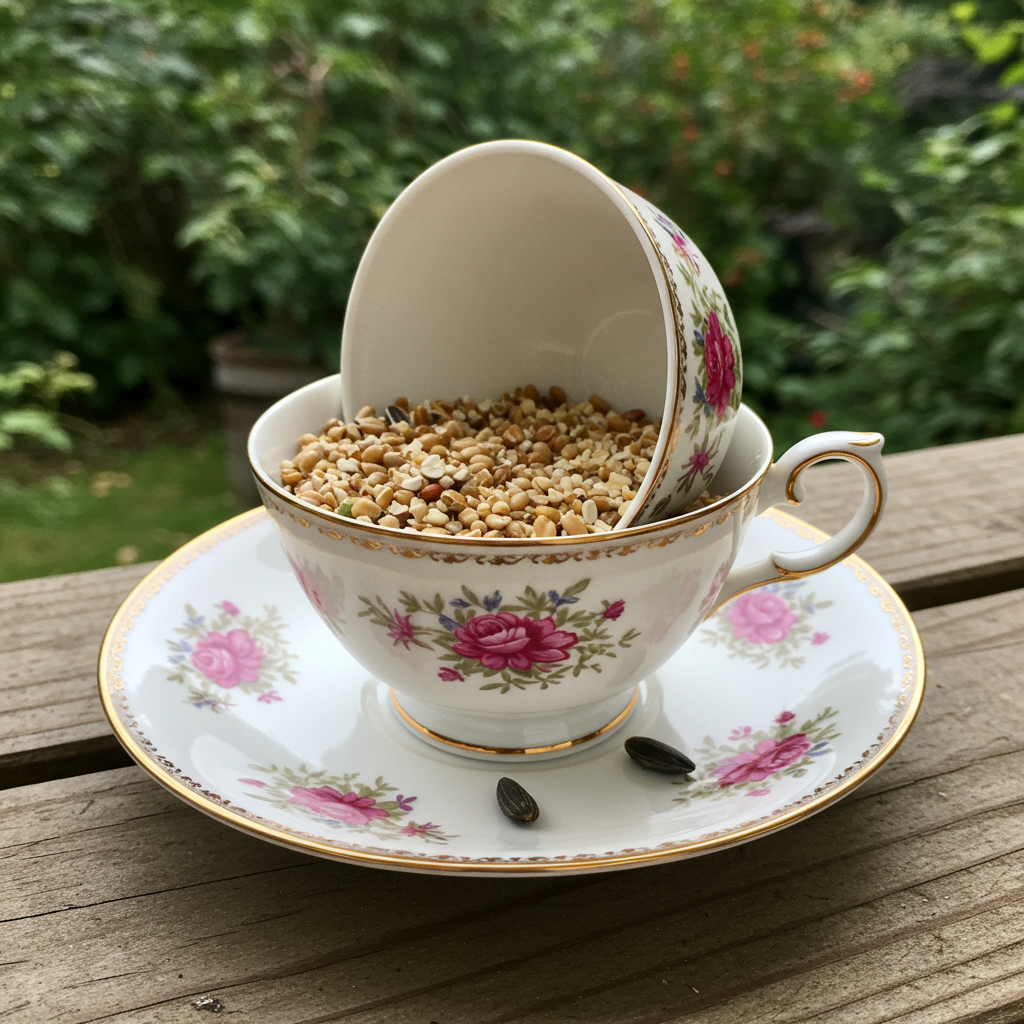
Invite some feathered friends to your garden with a charming and elegant teacup bird feeder. This is a lovely way to use up old or chipped teacups and saucers that you can no longer use for your morning cuppa.
You’ll need a teacup and a matching saucer, as well as some strong, waterproof glue like E6000. Simply apply a generous amount of glue to the side of the teacup and the spot on the saucer where you want it to sit.
You’ll want to glue the teacup on its side, so it looks like it’s been tipped over and is spilling birdseed onto the saucer. This creates a little perch for the birds and keeps the seed contained.
Let the glue dry completely, which might take a day or two. Patience is key here! You want to make sure your teacup is securely attached to the saucer before you hang it up.
Once it’s dry, you can choose to hang your teacup bird feeder or mount it on a post. To hang it, you can tie a string around the handle of the teacup. To mount it, you can glue the bottom of the saucer to the top of a copper pipe or a wooden dowel.
Fill your teacup with birdseed and watch as your new feathered friends come to visit. It’s a beautiful and delicate piece of garden art that’s also functional.
Frequently Asked Questions (FAQ)
1. Is it safe to use tires as planters?
Yes, for the most part. There’s a lot of debate, but most studies show that the risk of chemicals leaching into the soil is very low, especially for ornamental plants. If you’re concerned, you can line the inside of the tire with heavy-duty plastic before you add the soil, especially if you’re planting vegetables.
2. What kind of paint should I use for outdoor projects?
Always look for paint that is specifically designed for outdoor use. These paints are made to be weather-resistant and won’t fade or peel in the sun and rain. Spray paint is often the easiest option for getting even coverage on tricky objects like tin cans or tires.
3. Where can I find free materials for these projects?
You’d be surprised what you can find for free! Ask friends and family to save their bottles and cans for you. Check out local community groups online, as people are often giving away things like old pallets or tires. And don’t forget to keep an eye on the curb on trash day!
4. How do I make sure my hanging planters are secure?
When you’re hanging anything in your garden, safety is key. Make sure you’re using a strong hook that is securely fastened to a sturdy support, like a porch beam or a thick tree branch. Use strong rope or chain, and always double-check your knots.
5. I’m not very crafty. Are these projects really for beginners?
Absolutely! Most of these projects are very beginner-friendly. Start with something simple, like the tin can lanterns or the boot planters. The most important thing is to have fun and not be afraid to make mistakes. That’s part of the creative process!
Conclusion
Embracing DIY garden decor recycled ideas is about so much more than just making pretty things for your garden. It’s a way of looking at the world differently. It’s about seeing the potential in a piece of “trash” and having the creativity and vision to turn it into something beautiful and useful. It’s a powerful act of personal creativity and environmental responsibility.
But beyond that, it’s about connection. When you hang a wind chime made from your grandfather’s old spoons or plant flowers in the rain boots your child has outgrown, you are weaving your personal story into the fabric of your garden. These objects become more than just decorations; they become touchstones for memory and love.
Your garden transforms from a simple plot of land into a living scrapbook, a space that truly and deeply reflects who you are and what you cherish. So go ahead, dig through that recycling bin—your next masterpiece is waiting.